Data by Design: Automating the Chapter Timeline
Each chapter of Data by Design has a chapter timeline, which places images and visualizations on a vertical minimap, allowing the user to get a sense of the chapter and their progress within it at a glance. Additionally, all user highlights will be visualized on the timeline as they’re made. The map will allow the user to click objects within it and be taken to the corresponding spot in the chapter. Embracing the notion of a “meta-visualization,” each chapter’s timeline is styled after the main visualization in that chapter.

The Peabody timeline at time of writing
Initially, the chapter timeline rendered manually-entered metadata, a process that was hard to maintain and required an additional source of truth—whenever the structure of a chapter changed, we’d have to manually update the timeline data. Instead, I built an automated system that looks at the chapter content as it is to build the metadata that is given to the timeline. In this post, I’d like to an overview of how that works.
Compile-time or Runtime?
All of the chapter content is written and stored before it ever appears in your web browser. So should our chapter metadata system analyze the chapter content files or the rendered chapter content as it appears in your web browser? The former would happen at “compile-time”—during development, metadata would be generated by some sort of script, and the output of that script would be saved and uploaded along with the rest of the project to be referenced by the chapter timeline. The latter would involve an ad-hoc analysis of the chapter after it is rendered by the browser; metadata would be generated on the fly.
Both approaches have their advantages—the compile-time system would be more verifiable, more easily allow for manual tweaks, and would result in a slightly faster loading time for the user—but I went with a runtime approach. This is for two main reasons. First, I wanted a component’s exact vertical placement in the page to be part of this analysis, so that we could send the user to the right spot in the chapter when a square is clicked in the timeline. This exact rendering information is only available after all of the components have been rendered in the browser. Second, I wanted to be able to account for changes in the chapter structure that happened at runtime. For example, let’s say we had a chapter that dynamically loads an image only if the user clicks a certain button; I would want that new image to show up in the timeline then and only then.
Sections
In the screenshot above, the start of a new section is represented by a big square, and the length of the line to follow corresponds with the “length” of the section, with spots reserved for paragraphs, images, and visualizations (“subsections”). So the first order of business when building this timeline is identifying the sections in the chapter. My first try at this was to analyze the DOM directly and find the header elements, but we ended up building a reusable Section component so that the style of all the section headers could be changed at once. Once that component was built out, it made more sense to have the Section component register itself rather than for the chapter timeline to go looking for it. But what was to receive and manage that registration?
The Source of Truth
We need a place to keep track of what we’ve found once we’ve analyzed the chapter. Our project uses Vuex, a Vue-integrated state management system, to manage the data needed by chapter visualizations, so I created a Vuex store to track the necessary information for the chapter timeline. When a Section component is mounted onto the page, it tells this store that it’s been created and passes in the id of the section element. Then, the store calls a function that analyzes the children of the section element to determine how much space to reserve for subsections. Let’s check out an example: the first section of the Peabody chapter. When it first gets registered, the store analyzes its DOM children, and finds four elements:
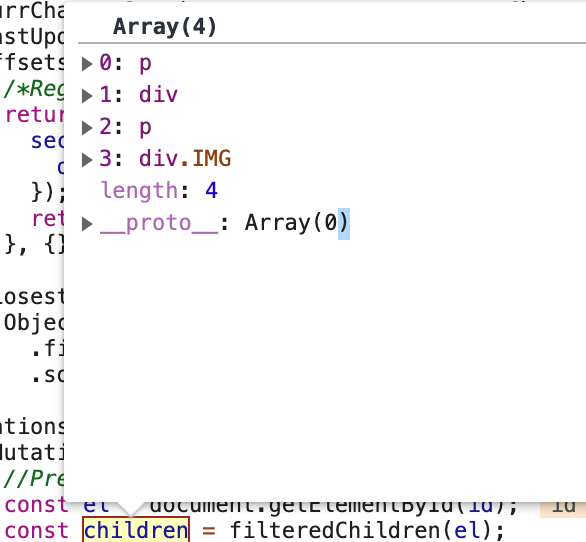
This is why you see four slots for squares on the timeline for this section. The next step is to take a look at these four elements and see what we know. One of the children—at index 3—has the special predefined “IMG” class, so we can go ahead and register an image at that subsection, which will show up as a green square in the timeline. We thus pWe don’t know anything inherently about the div at index 1 – is it a visualization, a scrollytell, or something that shouldn’t be put on the timeline? For elements like these, we again rely on the component to register itself with the store so that we can be confident about its identity. The div at index 1 in this example is the Map Scroller visualization. As I mentioned in my last post, visualizations all have a mounted hook that registers them when they get loaded into the page:

This actually happens before the section itself is registered, because in Vue, subcomponents’ mounted hooks are called before their parents. So by the time we do our section-child analysis, we’ve already been told to expect a visualization that looks like this element. So we’ll go ahead and save that information – a visualization square (orange) should be rendered at the second subsection slot of the first section.
The store allows us to have all the data required for the timeline in one, trackable place and decoupled from the timeline rendering itself. Thanks to Vuex’s debugging tools, which log every mutation to the store, it was easy to find bugs during development. And the store is decoupled in the sense that it doesn’t need to know any rendering details like the size or color of squares. It simply maintains the body of data needed for rendering, which is later passed to the Navline component for rendering.
Paragraphs and Highlights
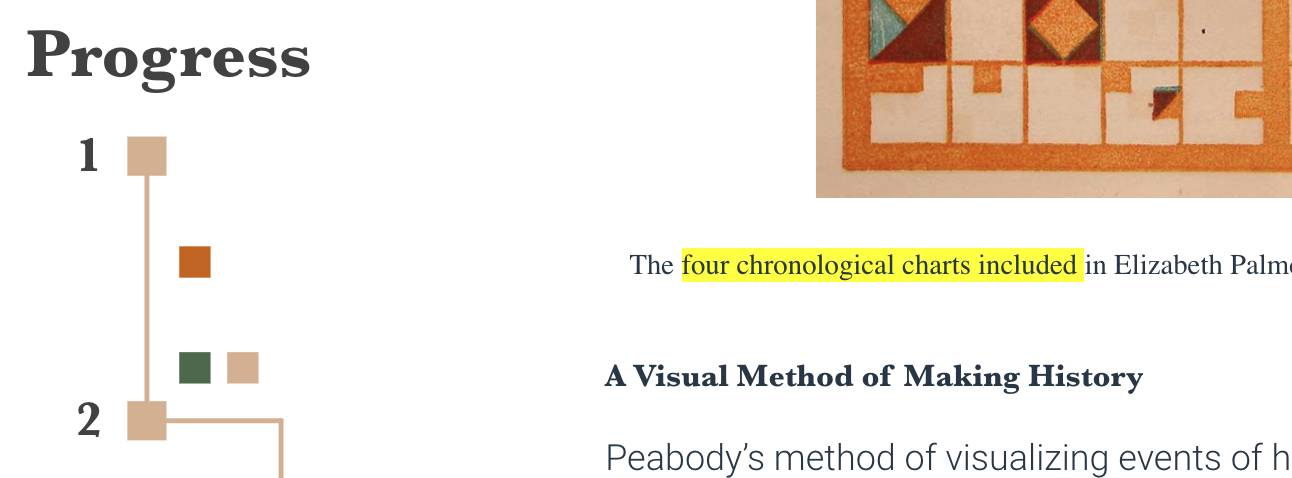
Paragraphs don’t themselves get a square on the timeline: instead, they’re represented by whitespace. However, when the user highlights something in that paragraph (and drags it into their notebook), an indicator shows up next to that paragraph slot: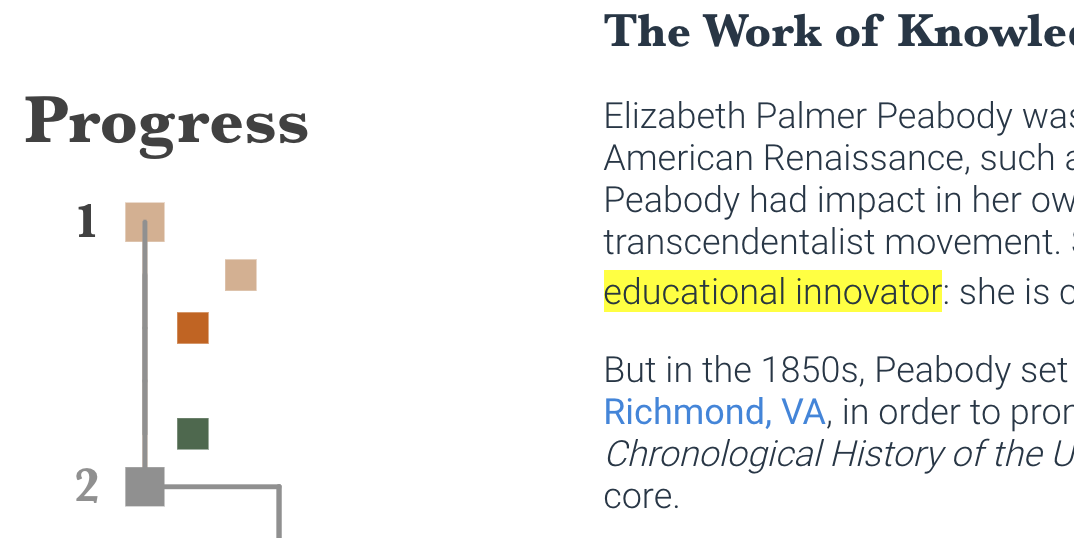
Similarly, when the user highlights a caption of an image or text inside a visualization or scrollytell, a highlight indicator shows up beside that:
As you might guess, this follows the same registration pattern I’ve described: when a highlight is created, it registers itself with the store, which tracks down its parent section and figures out which subsection slot it should be in.
You might notice that the Peabody chapter has two paragraphs before the Map Scroller (at least at time of writing), but the timeline only shows one slot. In fact, a highlight indicator will show up in that slot regardless of whether you highlight in the first paragraph or the second. This was a deliberate design decision to combine adjacent paragraphs into one paragraph slot, keeping the timeline from getting too long.
Takeaways
There’s always a tradeoff when automating something: you want to make sure that the time and effort spent in the automation process really does save you time in the long run. In the case of this chapter timeline, this automation process drastically speeds up future chapter development: we only have to worry about following certain registration patterns—most of which are codified in reusable components and mixins—and the timeline will be functional right off the bat. It also makes maintenance far easier: updating the timeline is the same process as updating the chapter itself. Lastly, it guarantees that the timeline always works the same way in each chapter; if we made them by hand, we’d have to consciously make sure we were consistent.
All in all, this feature was incredibly satisfying to build. I love constructing these process-improving systems, and there are a few more to talk about in future posts, but for now—thanks for reading!